How To Create a Board & Batten Wall on the Cheap!

Hi everyone! I'm so happy to be able to share how I created my board and batten wall on the cheap! It turned out exactly how I wanted and for a fraction of the cost, I mean, heck to the yes, am I right!?!?
I bet after reading that you are wondering how I did board and batten for any cheaper than the next person. Well, here is how! Huddle in real close, because I'm about to share with you some top secret information....Okay, I'm kidding about that, BUT this is a super useful technique to cut off hundreds of dollars (not joking, do the math for yourself!), and is not hard at all. Okay, let’s get to this top secret information already, shall we!?!?
Here is the big kicker to save money....instead of using backer board, osb board, mdf board as your backing to cut out your textured walls on the background, I simply retextured my walls which cost me a total of $8.95!! No joke, it cost my under $9 to retexture half of my entire hallway and totally looks like a super smooth surface under my board and batten! Talk about a big heck yes!!
Retexturing my wall could be a whole post in itself (which I haven't wrote yet) so if you would like to see how to do this, visit my Instagram page @thedecormama click on 'Retextured Wall' and that will give you all the information you need to know to retexture wall.
Okay, so as far as the actual board and batten wall go here is the material's you will need to complete this project:
1/2" MDF 4' x 8' sheets of board. (We chose 1/2" because we chose to leave up our base boards, but if you're not doing that and don't want extra work, then there are 3/4" MDF precut boards that are a lot easier work with and will save you a lot of time if you're looking for an easier project!
Table Saw
Miter Saw
Nail Gun
Level
Caulk
Tape measure
Pencil
*Optional*
Some people use glue as well, but we didn't in case ourselves or anybody who owns our house in the future wants to remove it, it will not remove parts of our wall.
You can also use painter's tape to give you a good visual of where and how high up you want your board and batten to go, but this is totally preference and not a necessity:)
Now that you have your materials, let's get to it!!
Here is what you need to do:
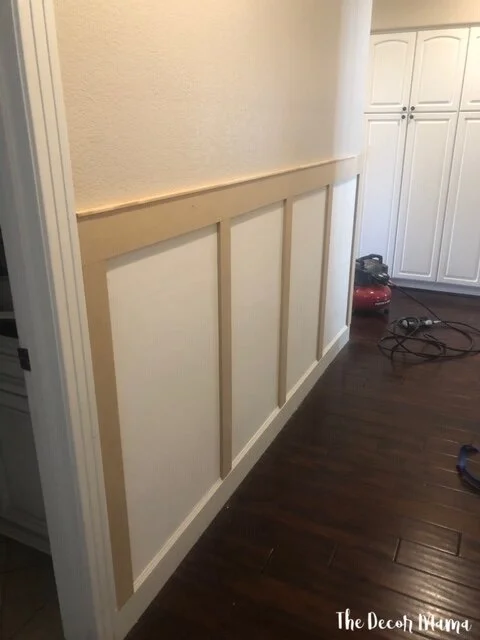
Measure out how high up you want your board and batten to go and how far apart you want it to go. This will all depend on the height and length of your wall. We went 4 feet up and 20 inches apart, but this is only because that's what worked for our hallway, which is where we added our board and batten wall. If you decide to go the MDF sheet route instead of the pre-cut route, then you need to decide how thick you want to cut your wood down to. We decided to make our top horizontal piece 4 1/2"thick and our vertical pieces 3" thick. This was total preference, but I have to say we are happy with the sizes we chose now that it's all finished.

Now that you have it all measured, marked, possibly taped off to show you what it looks like (we did that to give us a really good visual of what it would look like), then it is time to cut your MDF sheet down. First, we cut our 4 1/2" strips down because we wanted to put the horizontal strip on first incase our floors were uneven. That way, if we did have uneven floors we could adjust the height of our vertical boards that would go on next. This did come in to play a bit FYI.

So now that you have your strips for the top all cut it's time to hang them up. Using a level and your nail gun, make sure your MDF strip is straight and then nail it into place. Keep that going for the full length of the area you're working on.


Now that you have your top pieces all level and up, it's time to hang your vertical pieces! Start with the end section, measure and cut your board accordingly to that height. Then measure the next spot's height because remember, a lot of floors are uneven so it is smart to measure each spot. I know that is kind of a pain, but it will be worth it when each section of MDF fits perfectly! Once measured accordingly, make that cut and nail it into place using your level to ensure it is perfectly straight up. Repeat this process for the whole length of the wall space that you're working with.
Now that your horizontal and vertical pieces are up, it's time to put your trim piece of the very top to complete your whole look. Since mine was in a hallway I went with a super narrow trim piece, but you can play around with all different options that might look good. I used my nail gun to attach this to the top of the horizontal piece.
Once finished with hanging all your MDF it is time to caulk any gaps between your MDF pieces and your walls. This makes a huge difference in the final look so I highly recommend it!
Now that all of that is finished it is time to paint! Woohoo! You did it and get to have fun with choosing the paint color now!


Thank you so much for joining along on my Board and Batten process and I hope you love your final product as much as we do! It was a cheap and easy way for us to add so much character to our house!
XOXO,
Lauren
The Décor Mama